Sunday, September 24, 2017

A Very Simple Double Screen Buffer

The reason for creating a screen buffer is to have greater control over how things are displayed on  screen. It acts as an 'intermediary' step in memory before printing the final result to the terminal. If you have another copy of the buffer in memory, you can revert to previous stages.
Imagine you want to display a window to the user. Before doing so, you push the current screen to the old buffer. You show the new screen with the window on it and finally you pop or recover the previous screen from the old buffer. If you just update to screen the characters that have changed you can avoid any flickering effects that will come about by updating the whole screen every time.

In the old days of DOS, this could be achieved by accessing an absolute address in memory $B800:$0000.

[Old buffer] ----> [Current Buffer] -----> [Final Display]

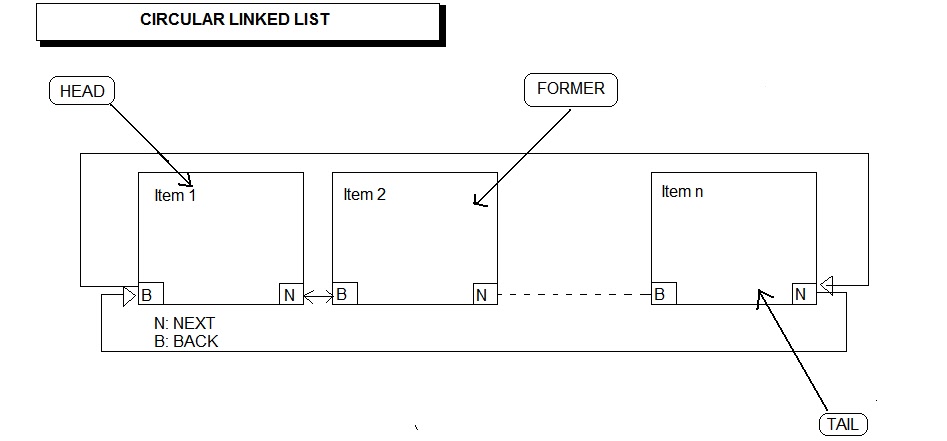
To create the buffer, we need to know the terminal dimensions in rows and columns. (See previous post). Because the terminal dimensions vary, we cannot predict before execution how large the buffer will be. That's why we need a dynamic structure in memory. My version uses a single linked list composed of cells. Each cell accounts for every 'pixel' on screen and records some attributes in a structure form -  namely, the character to be displayed along with its background and foreground colors. The size of our list will be determined by rows x columns. This representation in memory of the screen will need subroutines to control the display. Everything you want to show on screen will be printed to the buffer first. Then the update routine will finally show the final composition to the user. An additional buffer, called old_buffer, will help us revert to previous screens so as to show, for instance, a window area to the user and then closing it without affecting the text or screen portion that was behind it prior to the window being shown. The next step will be to create dynamic windows that store the information behind them in their structure. 


Structure detail + Screen caps:


Dropdown menu in text-mode/terminal coded in C for linux.
Source code:
https://mega.nz/file/cP1ABB5Z#IgZ2C-rR8R6Tw3LoLao8EMJbaIXTkKjNvrQk3KEpajw

Instructions: Download, uncompress and type make to build. Execute: ./test1

Saturday, September 23, 2017

YET MORE ANSI FUNCTIONS + TERMINAL DIMENSIONS


I'm working on creating a double screen buffer in C to have greater control of the display on the terminal. In the meantime, more useful functions useful to that end. :)

Show/Hide cursor:
void hide_cursor()
{
  printf("\e[?25l");
}

void show_cursor()
{
  printf("\e[?25h");
}

Draw box-like characters on Linux Terminal:
ASCII characters change from 106 to 121.
printf("%c(0", 0x1b); // Border chars on
printf("%c(B", 0x1b); // border chars off

Get Terminal Dimensions:

#include <sys/ioctl.h>
#include <stdio.h>

struct winsize max;
int get_terminal_dimensions(int *rows, int *columns)
{
//Get dimensions of screen and pass them by value.
  ioctl(0, TIOCGWINSZ , &max);
  *columns = max.ws_col;
  *rows = max.ws_row;
   return 0;
}

Tuesday, August 29, 2017

C POINTERS - CIRCULAR DOUBLY LINKED LIST


A Simple Selection Menu in C with Ansi functions. 
This time I'm working on creating a circular list with pointers so as to display choice menus in C using colors to highlight the items. 
In my implementation, I have used 3 external global pointers (head, former and tail). That probably means that I can only create one list as these pointers are global variables.


 Display:


Monday, August 28, 2017

We Love Colors - ANSI Functions II in C

You have several options to give your program a more attractive look in text-mode. Ncurses,for one, in Linux is an excellent choice. But if you want to keep it simple and do things fast, you can resort to using ANSI escape sequences. They work like a charm on Linux terminals. Unfortunately, its support was removed from Windows terminals. Although I hear Windows 10 has brought back support to these sequences. Alternatively, check Ansicon for windows support. 

From Wikipedia:


In C:

int gotoxy(int x,int y)
//Sets the cursor at the desired position.
{
  printf("%c[%d;%df",0x1B,y,x);
  return 0;
}

int outputcolor(int foreground, int background)
//Changes format foreground and background colors of display.
{
  printf("%c[%d;%dm", 0x1b,foreground,background);
  return 0;
}

int screencol(int x)
// Changes color of the entire screen.
{
  gotoxy(0,0);
  outputcolor(0,x);
  printf("%c[2J", 0x1b);
  outputcolor(0,0);
  return 0;
}

Sunday, April 16, 2017

Cellular Automata - Rule 90 and Rule 110

A cellular automaton is a model used in computer science and mathematics. The idea is to model a dynamic system by using a number of cells. Each cell has one of several possible states. With each "turn" or iteration the state of the current cell is determined by two things: its current state, and the states of the neighbouring cells.


Source WIKIPEDIA.

Rule 90:
current pattern111110101100011010001000
new state for center cell01011010
Output generated by my freepascal program of rule 90:


Rule 110:

current pattern111110101100011010001000
new state for center cell01101110
Output generated by my freepascal program of rule 110:


Friday, April 14, 2017

RGB Convert- Bitshift - SHR


If you want to convert an hexadecimal into its RGB components using a very fast technique then you should try Logical Shift. A logical shift is a bitwise operation that shifts all the bits of its operand. The two base variants are the logical left shift (SHL) and the logical right shift (SHR). They come from the good old days of Assembler.

So, how does it work? In our example, we will obtain the components or channels of the following hexadecimal value.

#ff0cf0 base 16

We want to get from 16714992 base 10 to:
red=255 ;  green=12 ; blue=240.


Note: To simplify we will just use 16 bytes and not RGBA of 24 bytes that includes the alpha (transparency) component. 
<Sample code in Freepascal:>

Program Convert;
var
  r,g,b: longint;

procedure RGB_Convert(RGB:longint; var r,g,b:longint); 

{Byvalue reference (var r,g,b). That means that we pass variables to the functions no values.}

begin
   R := (RGB shr 16);
   G := (RGB shr 8) and 255;
   B := (RGB) and 255;
end;

Begin
  RGB_Convert($ff0cf0,r,g,b);
End.

Thursday, April 13, 2017

A Simple Scroll Function


Imagine you want to display a long list of items but you have a limited area to show them on screen. In that case, you have to resort to using scroll.  Let me explain in pseudo-code one way of doing it.

Length is a function that gives the number of items contained in an array of items.
In our example DisplayLength will tell us how many items will be shown on screen. Here, we have set its value to two.

DisplayLength = 2;

Index will be the variable that holds the pointer of the current item on the list. At the beginning, it will point to the first item on the list. Hence index=0;
(Note: Computer scientists always like to start counting at 0)

Index = 0; 

Scroll_Limit will tell us how far we can keep scrolling. When Index = Scroll-Limit that means that we have reached the end of our scroll capabilities and that all items have been displayed to the user.
This is how to calculate it.

Scroll_Limit = Length (List A) - DisplayLength

In our example. Scroll_Limit = (6 - 2) = 4.

Here is our list: 

LIST A   (6 items)                DISPLAY (2 items)

aaaaa 0  -> index points to first item;
bbbbb 1
ccccc 2    
ddddd 3  
eeeee 4    
fffff 5

Imagine that you want to go forward in your list by pressing the arrow down button  (while index <= scroll_Limit). Remember that in this example, Scroll_Limit=4. This would be the result.

Now to go back, say, with the press of the up arrow key. You just have to decrease the value of index.
index-=1; Remember to set the limit at 0. Allow the key to be processed only if index>0;

Output:


Tuesday, January 3, 2017

Learning C++ - Credit Card Verification